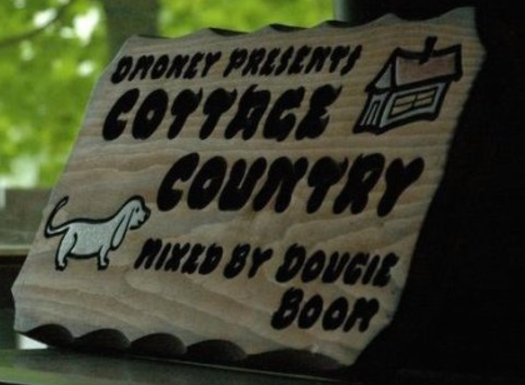
I am professional DJ, music lover, music collector, SEO specialist and copywriter based in Toronto. I have two Wordpress sites, one dedicated to my DJ stuff and one specifically for my Cottage Country Mix Series, a rock dj mix that has kind of taken a life of its own at 23 volumes. Please follow me for updates at dougieboom.com
The mix you have been “wading” for has arrived in its fourteenth (and final) year. Listen now!
The series finale of everyone’s favourite summer rock mix, Dougie Boom’s Cottage Country Mix, has just dropped its latest for 2021, with volume 24. Clocking in at over 2½ hours of classic rock, indie rock, psychedelic rock and new wave, it’s the perfect mix for enjoying summer, especially for those in the great outdoors! Whether you are hitting the dock, stoking the fire, basking in the sun or going for a dip, let us handle the tunes while you handle the heat.
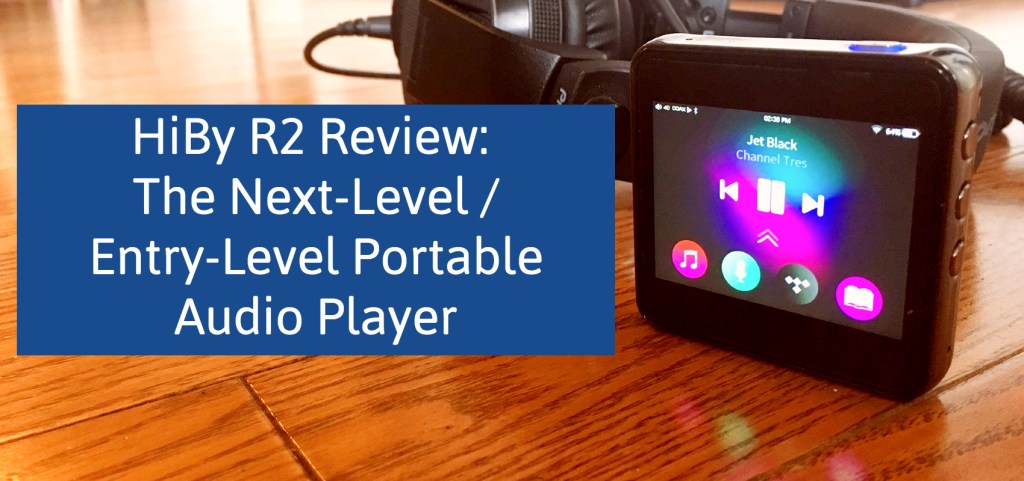
The popularity of dedicated portable mp3 players is on the rise again, except, now don’t call them mp3 players or your age (and knowledge) will be showing. Geekily, but more accurately, they are referred to as a DAP (or digital audio players) because strictly speaking they do more than play MP3s: FLAC, AAC, OGG, WAV, as well as old faithful, the MP3 file. But more than that, they may have features like: expandable hard drive space via swappable TS/micro SD cards; digital streaming via wifi; Bluetooth to send signal to devices; and like the unit we are looking at today, a DAC (digital audio converter) to turn your player into an audio output for your computer, stereo or TV.
Yes, portable digital audio players have come along way since my last purchases, the Fiio M3 from 2015 and the Apple iPod Nano 4th Generation from 2009. For many, these types of players offered very little from what the almighty cellphone could accomplish. Now, however, with expandable SD card memory beginning to disappear from cellphones, as well as no analog 3.5mm headphone output, music lovers are beginning to recognize the advantage of a dedicated portable unit for strictly music.
My little HiBy R2 unit is a “bad motivator”(Star Wars Joke) to take on the go.
There are many different DAPs to suit everyone’s needs. I wanted an under $200 (CAD) player that had: good sound, expandable memory, Bluetooth, decent battery life, a touch screen, good UI for navigating large libraries, and flexible playback options (e.g. random play, playlists) in that order. I considered the Fiio’s M3 Pro (no Bluetooth), Hidizs AP80 (very close 2nd but more expensive, older Bluetooth and I heard the rotary volume knob can be hard to adjust with one hand), Shanling M0 (lacks physical buttons, only expandable to 512GB and older bluetooth). In the end I decided to go with the HiBy R2 Pro.
The HiBy R2 Pro boasts:
Expandable TC/Micro SD card memory (up to 2 TB)
Bluetooth 5.0 (with UAT, LDAC, aptX, AAC and SBC transmission)
plays mp3, wav, ape, flac, dsf, dff, iso, cue, wma, ogg, aac, opus, aiff and more
USB DAC (connect it to a computer to use it as an audio output)
Bluetooth Bi-directional DAC (send sound to or receive sound from devices)
Dual band WiFi: 2.4/5.0Ghz
Tidal streaming app
Sabre es9218 chip that can handle 32-Bit / 384kHz and DSD128
Built in mic with noise cancelling function
HiByLink (use your cellphone to navigate the R2)
First Impressions
The box and offerings therein was extremely…minimal with not much to offer but brisk instructions and the smallest usb-c cord known to humanity. However, they did include a plastic protective case for the HiBy.
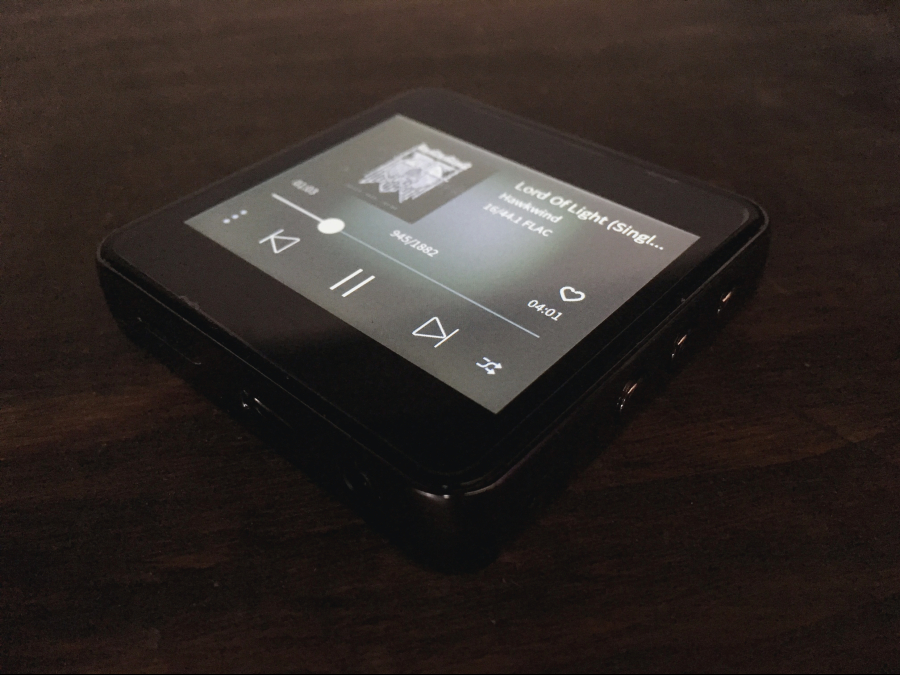
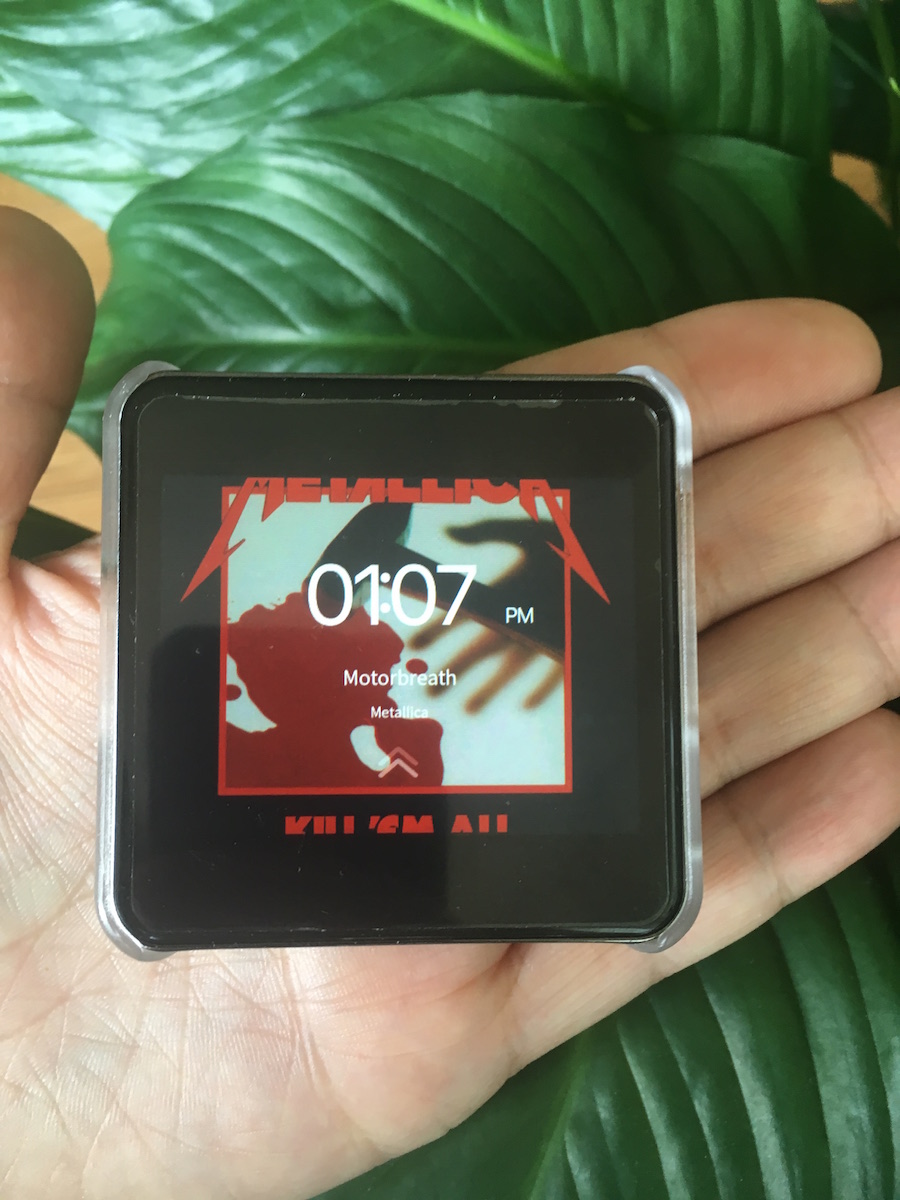
The R2 unit itself was impressive: dark silver metal edges (more silver than black), black high-gloss backing and glass touch screen. The R2 was a perfect size at 61x61x12mm. Substantial enough with a decent weight at 85g, but small enough to be cradle in your hand.
The R2’s only design flaw (IMO): is it’s rectangular screen on its appealing square form.
The screen has ok resolution at 480×360. My only complaint is that the screen doesn’t extend to the full height of the unit, which would have made full use of the R2’s square form and, more precisely, most albums cover’s square format. Instead, the album covers are cut off or appear in their smaller form. With its perfectly square design it would have been nice to see the cover fill the entire front of the device.
Like many have remarked, the plastic film that it comes with (as seen throughout) is cheap and thick, meant mostly for transport. It hinders the look, feel and functionality of the touchscreen and I recommend you get a new thinner one. HiBy should probably just pay whatever the cost is and get better quality screen protector. However, there are so many types of screen protectors (blue light, privacy ones) and maybe they thought the choice was best left with the consumer and perhaps some prefer no screen protector at all.
Also, something to consider there is no on-board memory. For that, you need to get a Micro SD card but the R2 can handle cards up to 2TB! Which is more than enough for most music fans even with larger files.
Functionality
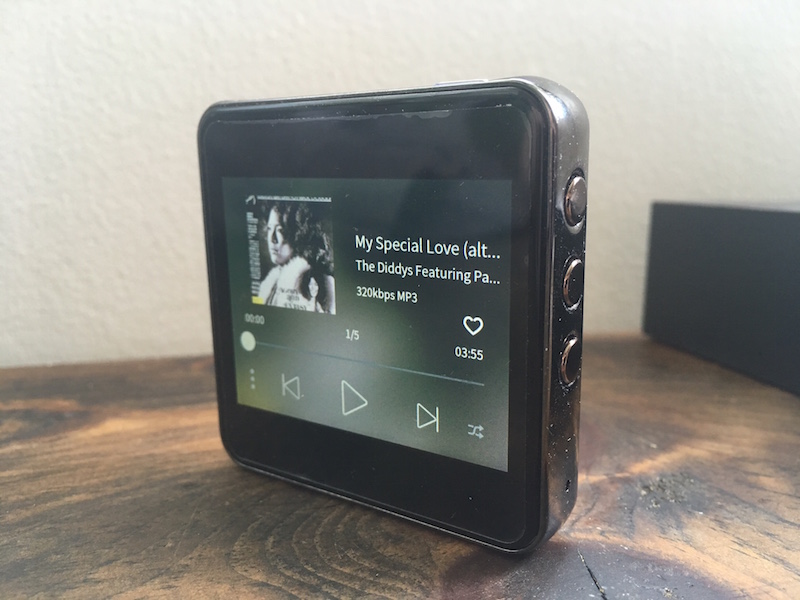
The buttons for basic player operation are located on the unit and can be easily accessed and identified by feel, especially if the R2 is in your pocket. On the top is the On/Off button that changes with colour depending on the file being played (e.g. Blue for 16-bit, Green for 24-bit…). Probably unnecessary but appealing. On the left side of the HiBy R2 are the up and down volume buttons. I found the volume gets really loud even on low output setting but you can set the ‘max volume’ in the menu (under ‘play settings’). On the right side: the top button is the rewind, the middle is pause, and bottom button is fast forward. The buttons feel pretty solid, some people complained of wiggly buttons but it feels fine to me, perhaps if you are coming down from a more expensive player.
At the bottom is 3.5mm headphone out jack, the Micro SD card slot and the USB-C input. Another design consideration, the USB-C input is slightly off kilter, so if you put it on a Usb stand it is little more to the left (not a big deal). If you prefer your cords were coming out of the top of the unit, it has ‘screen rotation’ function to do that.
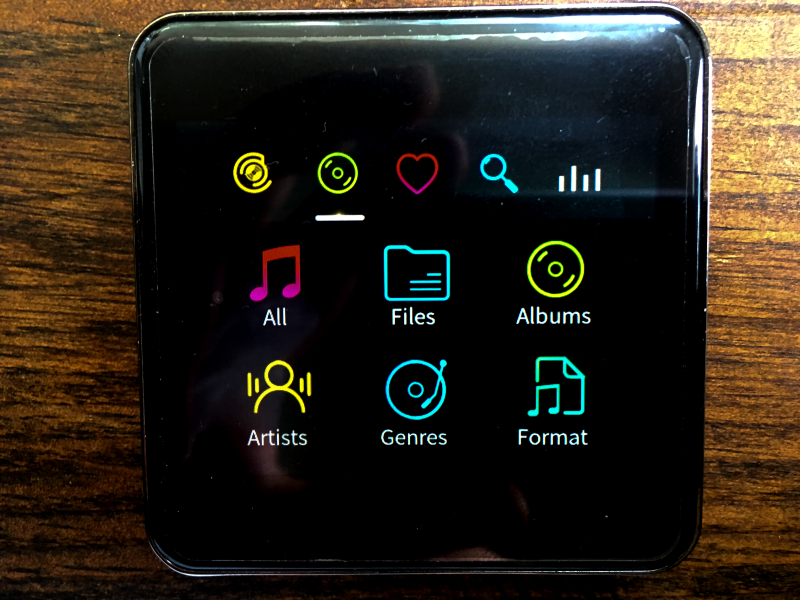
The music menu system on the HiBy R2 DAP.
The HiBy uses a propriety-Linux based system that is mostly thought out, although I did find at first I would get lost swiping through menus sometimes. I found the software to be a little sluggish at first but I found the update did help (store.hiby.com/apps/help-center#hc-r2-firmware-v11-update) . As others have mentioned, navigating songs (and in some cases albums) is a little bit cumbersome. You can scroll down the right side of the screen in song mode and it will shuffle through the alphabet (rolodex style) but I found, because of its relatively small screen, there were misfires (e.g. opening up other functions on the screen). This may be a deal breaker depending on your playing habits. Usually, I prefer to listen to my entire library at random, unless I am in a mood for something specific.
So, for the sole purpose of this review, I thought I would try the HiBy Link feature, which allows you to control most of the functionality of your HiBy from your phone or tablet. It’s available for free as the HiByMusic app (available for IOS and Android). For this test, I tried it on my old iPhone SE and unbelievably it worked! And more than that it was actually quite enjoyable using it. Which opens up lots of different possibilities (e.g. you could plug your HiBy directly to a speaker through the 3.5 mm port, then use your phone to skip tracks or create a cue of with a couple songs). The experience is similar but is a bit more slicker on the phone.
The HiBy Link allows you to control your HiBy through your phone or tablet. It will make you wish the Hiby itself was more like this.
Another problem, I have with the Hiby is the Bluetooth isn’t as strong as I hoped. Although it boasts a Bluetooth 5.0 and many different codecs, I found that the Hiby’s Bluetooth had weak connectivity with its range being only about 25-30 feet (whereas my iPhone could go a 100 or more feet with the same Bluetooth speaker). Furthermore, It had problems sometimes connecting with older Bluetooth devices. These things are hard to gauge when it comes to who the real culprit is, but sometimes I found it difficult to get a good connection to my gf’s Toyoto Yaris 2018 with speed ups and drops (where again cellphones had no problems).
Final Thoughts
The HiBy R2 is a remarkably full-featured entry/level DAP at a good price with my only big gripes being the weak-ish Bluetooth and its short screen. But it sound great and because of its up to 2TB expandability makes it a little more future proof.
Paired with free music library software, MusicBee, I have been really happy with the results and it has worked out better than any Apple set up I have had previously. I think in the long term a dedicated audio unit like the HiBy R2 will workout better than any cellphone dedicated to a music library that will eventually (by fate or design) become a brick (I find my old cellphones barely turn on or function).
Again, I am constantly amazed by the sound. I was listening to Aphex Twin’s “Phloam” from Classics, which is a combination hard techno beats, distorted high-hats and lush synth pads. It was amazing how not-harsh the high hats were despite the heavy distortion. Every element fitting in the right place sonically. Likewise, switching over to Doobie Brother’s “Me and The Captain” 24-Bit Flac had lots of detail (e.g. acoustic guitar strings shimmering). The HiBy was able to handle everything and make it sound good (without any EQ changes) and on different headphones (from Bose SoundSport In-Ear Headphones to my Pioneer HDJ-X7-K). Maybe its time for new headphones too?
Pros:
–Quality DAP with so many features it’s staggering.
–Sounds great with plenty of options to shape the sound (EQ and their to the speaker or headphones.
–Expandable Memory: can use micro SD cards up to 2TB.
-Pretty decent battery life boasting 15 hours (depending on file size), I would say it is a little lower than that (12-13) which is still pretty decent and is on par with better bluetooth speakers.
-2.45” Touchscreen display
–DAC capability
–Hi-res audio streaming from Tidal. (with Qobuz)
–Dual microphone
–3.5 mm headphone jack (for those of us who are still plugged in)
Cons:
-Bluetooth 5.0 pairing can be spotty sometimes and range is low for a 5.0 device.
-The screen doesn’t extended all the way to the top, making full use of the unit’s surface and making full use of the covers.
-Wish it started with any song in random mode. You have to pick a first song, then after that it’s in random. I want to turn it on, hit play and boom we are playing.
-As many have indicated scrolling through songs and albums is pretty painful and my fingers aren’t that big.
-The telephone style keypad for typing is slow
-Wish it had an album cover swiping mode. They have an album category (of course) but you just scroll alphabetically.
-Some bluetooth connectivity issues to older devices.
It’s hard to see the forest through the trees when it comes to the portable speakers, but despite it’s small size the Avantree SP850 has everything you need in a Bluetooth speaker, including FM radio and SD card.
Labelled as a 3 in 1, the Avantree SP850 is more like a 4 in 1: a Bluetooth speaker, that also has an aux in, an FM radio and a SD card reader for audio files.
The market is saturated with Bluetooth speakers with many that sound good at a decent price. However, they often lack very little imagination. They are usually big, booming, bulky boxes with lights, that have either Bluetooth or a card reader to play music files. However, the Avantree SP850 is a little different. It’s more like a small lightweight radio, with all the bells and whistles in a small package.
For cleaning your dirty records is the Panagea Record Doctor IV 20the Anniversary Edition what the doctor ordered?
A record cleaning machine has always been on my wantlist, but (like many) because of the price and lack of surface space for a dedicated unit I put it off. Ok, it may have also been because I was buying records instead. Now that I am trying to record my records digitally, having clean records is paramount. With the Record Doctor VI, I feel I was able to get the best sound out of my records possible at an affordable price. Cleaner records = better recordings.
Personally, I have been in the process of ripping my records to digital copies for listening and DJing. During the process I have purchased a turntable specifically for this, changed its needle to something a little more respectable, and have tried various mats with varying degrees of success. However, the crackle created by deeply embedded dust always bothered me. Even records that seemingly looked brand new would have that intro / outro crackle and also intermittently throughout, especially in quite parts. Obviously this is the life you choose if you play records. It is not a CD, mp3, flac or wav file.
So, I did a little research and found that Panagea had recently released an updated version of their Record Doctor series. The previous version Record Doctor V had received a lot of good reviews, but the newest Record Doctor VI boasted notable improvements:
New sturdier aluminum chasis that is easier to clean.
New mold-injected turning knob, which is bigger than the Doctor V. Easier to grip and covers the whole label, protecting it from solution.
New fan and venting to keep it quieter and cooler during operation (now also on the V)
However, in Canada it was not so readily available during the summer, probably due to Covid. However, it has finally become available in Canada again, after a hiccup in production and distribution. Finally, I received the new Record Doctor VI, purchased at PC Audio from London, Ontario for $439.95 CAD.
Manual Cleaning on The Record Doctor IV “First Hand”
Like the monolith from Kubrick’s 2001.
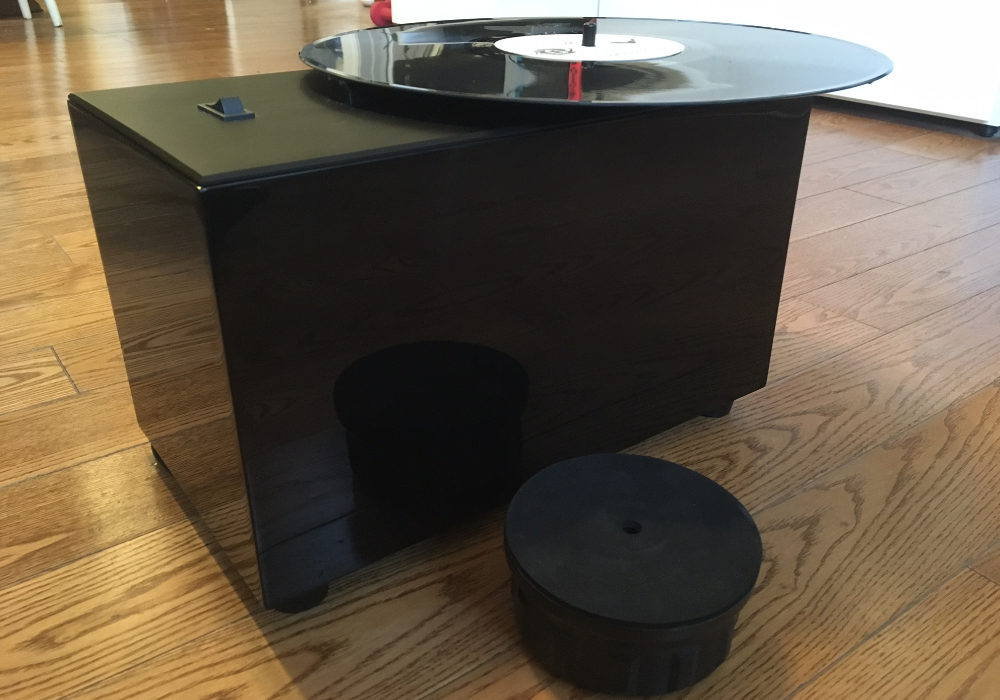
My first impressions were good! There are two different versions, the ‘Carbon Fibre’ and the ‘Gloss Black’ (which I chose) has a sleek look, that would be easy to clean (with solution mishaps) and dust. The sides are a glossy black but the top is a black brushed aluminum (nice texture). It has good solid weight to it and was a good size.
Now, first hand, the process of manually cleaning records on the Doctor VI, is not that tasking in the slightest. You simply take your LP or 45 record, place it on the machine on the spindle (at first, the side up that you want to clean), put on the turning clasp. You put a couple of drops of cleaning solution on the record surface. Then, using your application brush you spread the solution on your record (running circular in the direction of the groove). You may be tempted to spin the record and hold the brush but Record Doctor warns not to spin records without solution. So, taking in consideration for the bottom side of the record, that is close to the vacuum strip, instead I do a 12-6 o’clock spreading of the solution followed by a light rotation of the record and another 12 to 6 to spread the solution to the other side. Being careful not to add too much solution, but maybe more for dirtier records.
“Let’s go crazy, let’s get dust…” on this Prince 45 using the Record Doctor VI.
The Record Doctor V includes Panagea’s own Record Doctor Clean Sweep Brush to apply the solution. I have always been weary of these types of micro fiber brushes, preferring the 70s-style velvet brushes. However, the Clean Sweep Brush with its 260,000 ultra-fine nylon bristles when used in conjunction with the solution feels more more like a squeegee, smoothly going over the surface of records and gets all that gunk in the grooves. Very effective and feels smooth.
I “choke” the vacuum strip with my thumb to make up for absent vinyl space when doing 45s.
Then, after the solution is applied, you flip over record, apply the clamp and turn on the vacuum. Next, you rotate the record, turning the clamp, as the vacuum strip sucks the solution off the record and takes all the dirt and grime with it. The speed and direction at which you turn the record is essentially up to you. That is the good thing about manual record cleaners. You can focus on problem areas of records or areas that have a lot of solution. Also, you can go either direction clockwise or counter clockwise, back and forth at will. The vacuuming process shouldn’t take much longer than 30 seconds or so. Remove and inspect the record and if it still looks saturated, repeat on problem areas.
After cleaning: Prince would approve. He could see his own reflection in these.
Although their quick manual does not include the extra step, I give the record a rinse after with some distilled water and then use the Record Doctor again to dry the record.
The REAL dirt on The Record Doctor IV (Verdict)
Hats off to the Record Doctor VI. Highly recommended.
If you have always wanted a cleaning vacuum machine for your records but haven’t because of price, Panagea’s Record Doctor VI may be for you. Because of its price point and functionality it is definitely your entry level cleaner, however I couldn’t see how it can get much better than this. It sucks and that’s a good thing. Sure, automatic record cleaners offer there own conveniences but ones that change the direction of rotation are more expensive. This you can manipulate the record to your heart’s content, much like the Nitty Gritty Record Cleaner but $400-$1200 cheaper.
I was really blown away by how clean the results were. Better than any other cleaning record method or solution than I have ever tried. You could see the individual grooves of the records come to life and appear more defined just by visually inspecting the record. Of course the records sounded better. It is hard to quantify but I would say dirty records were improved 15-25% and records I thought were clean were 10-15% better.
As far as the unit itself, the Record Doctor VI aesthetically looks good, takes up very little space and can be easily placed aside and brought out when needed. It was easy to operate. Panagea boasts since the Doctor V, they have improved the loudness of the vacuum and overheating with the inclusion of a new vent and fan (located at the bottom). This may be so but it is still pretty loud and can get pretty hot. This wasn’t so much of a problem as it changed my workflow of how I cleaned my records. I would clean one side using the Doctor, rinse with distilled water, vacuum the water off, then let the record air dry for a bit. After about 10 records I would stop, as the unit seemed hot to the touch and ready for a cool down. I would then record the newly cleaned records and do the reverse and
One thing that is odd is that I haven’t had to empty it of any liquid from the Record Doctor. It has a plug at the bottom which you remove to let the vacuumed solution and water drain, which they recommend after 20 -25 records. I have done at least a 100. I don’t know whether it is the dry Ontario fall/winter climate or the heat from the machine itself but there is never any access solution / water to empty. hmmmm?
Although, there is included solution you may want to get more solution (if you don’t have any). Panagea also offers concentrated solution, you simply add water to (distilled water over regular tap is probably a good idea). Also, the Record Doctor VI does not come with a cover, which is sold separately. If you have the skills you could probably even sew one with pockets yourself.
I’M A Doctor, Jim, Not A MAGICIAN…
As magical as result can be on the Record Doctor VI (it should be clear) it cannot completely alter what has already been done regarding the condition of your record. That is to say, don’t expect the Doctor to remove deep scratches. As far as I know there is no technique to repair a record. What you will get is the cleanest possible record with the dust and dirt removed. So, set realistic expectations, if your record is trashed you may just have to buy a new copy. And that copy the Doctor will keep as clean as possible for a long time.
REcord Doctor VI – Pros
More affordable manual vacuum record cleaner.
Sleek look that looks good and feels solid.
Comes with brush for application and a small amount of cleaning fluid.
RECORD DOCTOR VI – Cons
Despite the newly added vent, it is still pretty loud and hot, so you should moderate use. Think 70s vacuum more than hair dryer loud.
Replacing the Sony PS-HX500 stock cartridge with the Nagaoka MP-110 Difficulty: Medium Time duration: 30 minutes to an hour
After my favourable reviews of the Sony PS-HX500 more than a year ago, and with idle time during self-isolation, I decided it was time to replace the factory needle on the Sony PS-HX500. My first decision was which cartridge?
There are many things to consider when replacing your needle on the Sony PS-HX500. Firstly, it needs to be a moving magnet cartridge. Also, on the Sony PS-HX500 there is no height calibration for the arm, that means the needle needs to be the same height as the stock needle. If it isn’t you will need to get a shorter or taller mat to compensate. Also, most importantly for the Sony PS-HX500, it does not have a removable headshell, instead the wire leads are straight from the tone arm. Only the cartridge is removable. So, there is even more to consider for your needle purchase. Depending on the height of the needle you may have to get a new mat for the difference in height.
So, scouring the internet high and low I narrowed it down to:
Ortofon 2M Bronze: pricey but I hear performs well. Maybe the next one. [UPDATE: reader KDV commented below that the Ortofon is too big for the headshell. May want to reconsider]
Goldring 1006: I heard it also performs well on the Sony PS-HX500, but a little pricey in Canada compared to its cost in Britain and Europe.
Sumiko Pearl: my first choice initially. I worried about replacement needles for the future, as it was not widely available in Canada.
However, everywhere I turned the Nagaoka MP-110 was continually mentioned. Some enjoy the sound, while others think that for its deep bass and crisp highs, it sacrifices the mids. I considered it and thought if my primary use for the Sony is to mostly rip DJ records for digital copies, then good emphasis on the bass is probably a plus. I am not a fan of too much bass reproduction but sometimes you get better results dialing back the bass later, then adding bass to the recording.
I found the cheapest Nagaoka MP-110 in Canada (at the time) at Hifipro.ca and decided to make the purchase. Best case scenario: I like the results. Worst case scenario: I know it is probably going to be better than the stock cartridge that the Sony comes with.
Replacing The Cartridge On The Sony PS-HX500
Disclaimer: replacing the cartridge on the Sony PS-HX500 is notoriously difficult. Again, it doesn’t have a detachable headshell like many turntables you may or may not be familiar with. I thought I was prepared, having replaced cartridges with headshells in the past with ease. The wires however are very thin and very delicate, so proceed with caution. If you have any hesitation you may want to enquire with a stereo repair place to see how much they would charge to do it. Either way I am not responsible, you have been warned.
Things You Will Need
replacement cartridge (here a Nagaoka MP-110)
a clean surface
angled needle nose pliers (1 mm)
small phillips screwdriver (1 mm)
cartridge stylus alignment protractor
digital turntable stylus force scale gauge
Place turntable on a clean, flat surface.
Remove the lid from its hinges if attached.
Clamp down the turntable arm, so it doesn’t move.
Keep the cartridge attached, do not remove the screws from the cartridge yet.
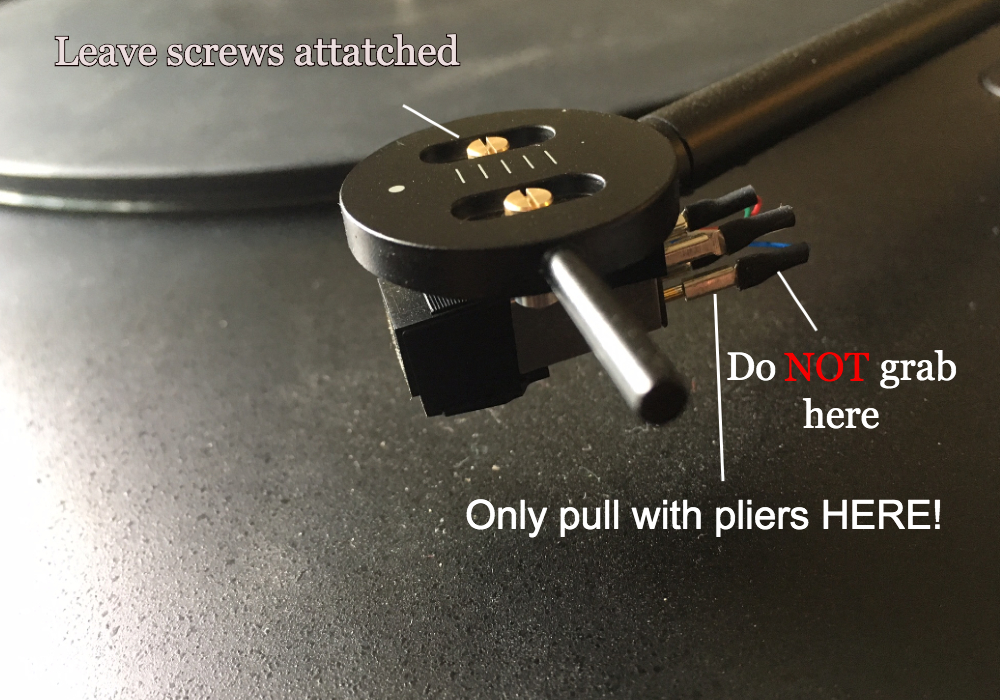
Remove the wires from old cartridge first, grabbing only the metal part with your angled needle nose pliers, apply pressure. Do not grip or touch the black rubber insulation nor the coloured wire itself.
With light force pull the wire back off of the needle by the metal clasp. You must be careful not to grip too hard or the metal brackets will be squeezed and grip the pins. But also make sure not to lose grip or pull to hard. Doing so may separate the wire from the metal attachment. I almost broke one wire myself.
Once all the wires are removed then you can detach the old cartridge by unscrewing the tiny screws on top of the headshell.
Take off the cartridge, save all the screws and washers and replace the plastic cover for the needle (hopefully you kept it, always keep the cover).
Remove new Nagaoka cartridge from its package.
To install the The Nagaoka cartridge (in this scenario) it requires you to use the old washers that came with the turntable.
Simply repeat the steps backwards: attach the needle to the headshell with the screws, then attach the wires to their perspective colours. Taking care to be gentle with the wires.
Once the cartridge is attached, use your cartridge stylus alignment protractor to make sure needle is properly aligned outside and inside of the center of the platter.
Finally use your digital turntable stylus force scale gauge to figure how much weight your needle weighs and how much counter weight and tracking you should use.
Adjust cartridge, weight and tracking where needed.
Results / Reviews
So, far the Nagaoka MP-110 has been a great replacement needle for the Sony PS-HX500. Not only is of the relative same height, so I didn’t need to replace my mat, it also sonically sounds great. Delivering nice bass and good highs and much better staging than the previous needle. It should be noted that once your needle is installed you should give it 50 hours or so of listening to get optimal sound out of your new needle.
A cheap (and cheerful) DJ booth monitor for your home DJ set up, the PreSonus Eris E3.5 Speaker.
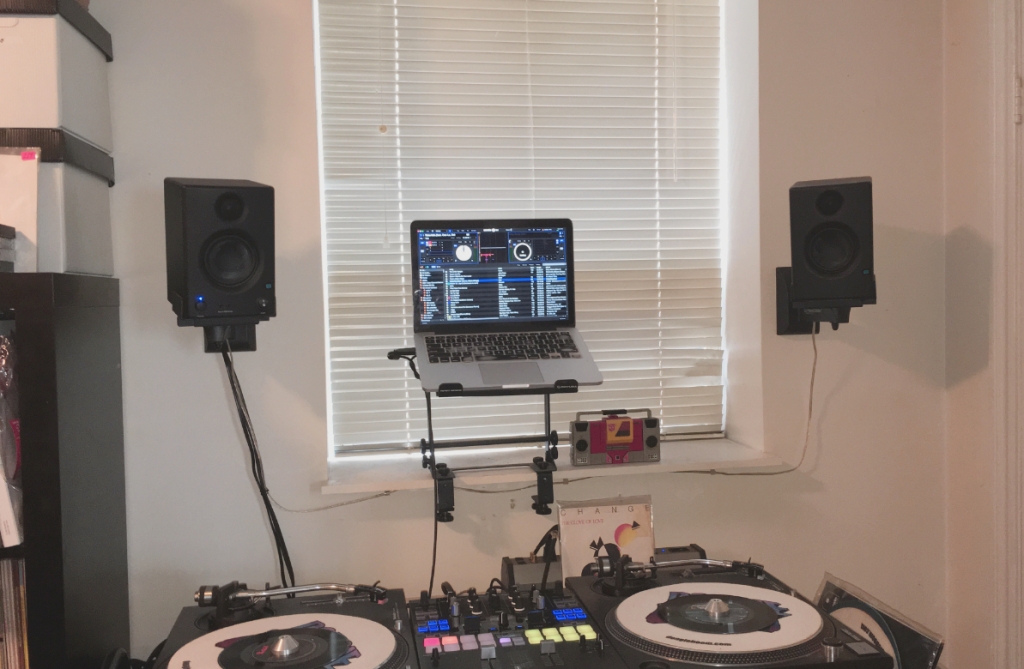
Last year I was looking for a speaker monitor solution for my home DJ booth set up. I wanted a pair of small lightweight speaker monitors that offered relative good clarity for a small price. My intention was to hang the speakers over my DJ booth which sits close to a wall. So, I didn’t want huge speakers that jutted out too far (as to be too close to my ears), nor did I want the speakers to obstruct my DJ space. Furthermore, I didn’t want the speakers to be too heavy, as it would be harder to mount and didn’t want big heavy speakers precariously hanging over my gear. (I know, try mounting them properly). I do have a pair of QSC CP8 but even these for their small size seemed like overkill for this purpose, if I am just DJing in my small studio/dj room. Also, I didn’t want to have to dismantle the CP8 speakers every time I needed them for a gig. I was looking for in situ speakers that would be ready anytime I wanted to DJ or listen to records.
For years, I would practice DJing or listening to records in my headphones almost exclusively. I still do often but you are really limiting your experience by not listening to music or DJing on speakers. There is something magical and sound altering that happens once music is played through the air. So, it is really important to experience both for perspective. Also, I realized that once I wanted to start making DJ mixes on vinyl again (without computers or screens), you need speakers to do “old school” cueing: previewing the next track in your headphones before you drop it into the main mix. This makes only using headphones problematic. So, that is when I decided I needed speakers to make analog DJ mixes.
Alternatively, for speakers I looked at the Pioneer DJ DM-40BT DJ Studio Monitors (only RCA inputs), the Mackie CR Series CR3-3-Inch (wow, that’s some green colour) and the KRK Rokit 4 (that’s a lot of bass). However, after much consideration I went with the PreSonus Eris E3.5 Professional Multimedia Reference Monitors. Now, after a year of use I can say that I am happy with the purchase. The Eris E3.5 sound great! Good clarity and flexibility. I was worried that these speakers would not be much better than your conventional computer speakers. However, I was wrong and they have exceeded my expectations.
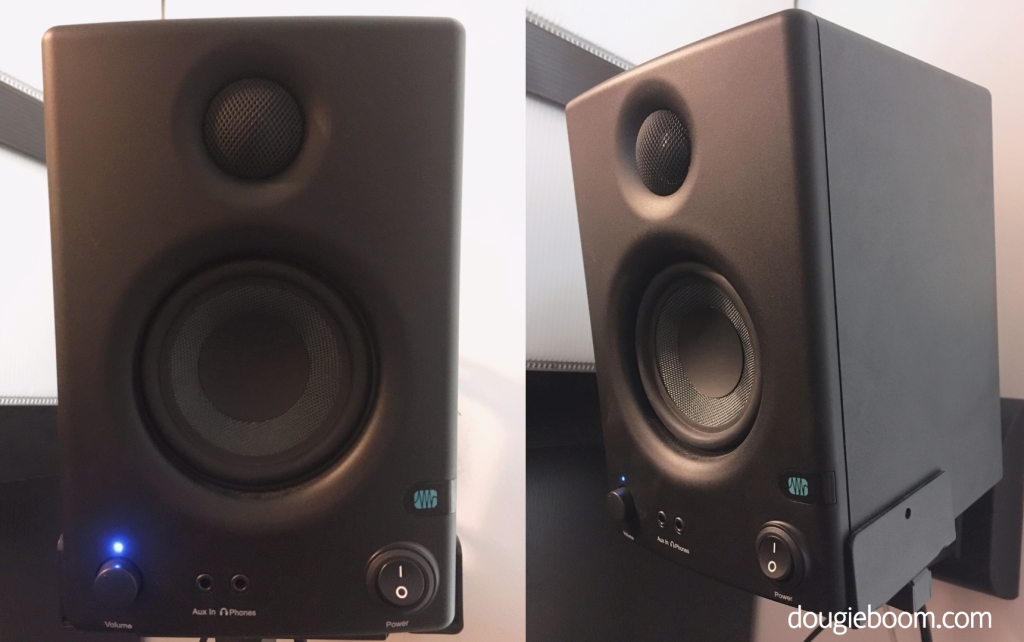
PreSonus Eris E3.5 Features
First off, these are not a bass heavy type of speaker. For that I would consider the KRK Rokits with its front ports are known to be a bassier speaker. If you are mostly listening to bass heavy music then you may prefer those instead. For me I was looking for something more neutral sounding. I own Yamaha Monitors for my studio and they are extremely flat but clear in their response (what you hear is what you get). That is not to say that the bass on these Eris do not meet my expectations. A smoother more subtle bass is delivered by the E3.5’s 3″ woven composite woofers. A 1″ silk dome tweeter offers clear highs that aren’t too harsh. The speakers are plenty loud at 25 watt/side power amplifier. Its more than enough volume, considering my use and its proximity. The E3.5’s are active (powered) so they don’t require an external mixer or a power amp.
The speakers have a low profile with a width of 5.6″ (141 mm), a depth of 6.4″ (162 mm) and a height 8.3″ (210 mm). The speaker cabinets themselves (I thought were plastic) are actually medium-density fiberboard with vinyl-laminate, so some of the sound is preserved.
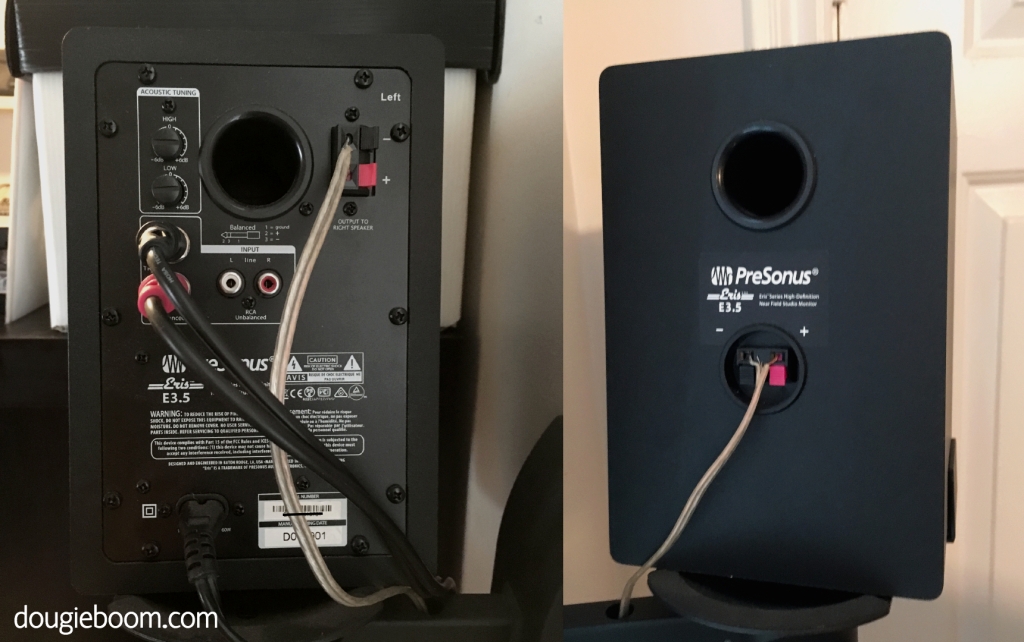
The speaker with all the connections is powered and feeds to the other through speaker wire.
On the back it includes a stereo RCA input (unbalanced) but the real kicker is the inclusion of 1/4″ balanced inputs! A little bit unusual for a speaker of its size, most would use 1/8″ or RCA, but the choice to include them is so appreciated. I would say 60-70% of the DJ mixers or controllers out there have a 1/4″ outputs (for the booth outputs or otherwise), so hooking a DJ mixer with a stereo 1/4″ cable sounds great and is seamless. It includes two EQ controls on the back for highs and lows (-6dbs to + 6dbs). The AC port is a female C7 2-Pin style port, which is easily replaceable and non-proprietary.
On the front, we have the volume and power switch conveniently placed, making it easy to access. Most monitors usually have these controls on the back, but this works especially for our purpose of being wall-mounted. Also on the front there is the inclusion of a 1/8″ headphone jack and aux in jack, which both sound pretty good as well. The ‘on’ light, although not adjustable in brightness, is a soft blue and will not burn holes in your eyes.
“Your all I need to get by…..” The Eris speakers more than o-blige for your DJ room set up.
Presonus Eris E3.5 Conclusion
The Presonus Eris E3.5 have become more useful to me than expected! I use them now all the time: listening to my DJ blends, previewing finished mixes and songs, preparing for gigs, and listening and grading 45 records. Yes the Eris E3.5 are that discriminating in sound! You will hear vinyl records with pops and all. But most importantly I hear great balanced sound coming from my Pioneer S9’s booth outs. Once you get the eq-ing right (from its controls on the back), taking in consideration the room and how far they are placed from the wall, just as you would normal studio monitors.
I was worried that the speakers would not be able to take the signal from my mixer without overloading or sounding terrible, but I was and still am really happy with them. Some critiques complained that the rear ports allow the bass to be absorbed by nearby walls. However, mounting them away from the wall with speaker mounts, gave them adequate space from the wall and eliminated that problem for me.
For mounting them, I used Primecables Speaker Wall Mounts, which are another bargain and are easy to set up. Plus they are Canadian company. You can tilt them to almost any specification and they hold up to 55 lbs, easy for the Eris’ 3.5 lbs each.
Lastly, it should be noted I would never consider the PreSonus Eris E3.5 as “gig” worthy speakers. These are more so for home/personal use, as inexpensive but great sounding studio monitors. However, they make a great powered speaker solution for your home DJ set up. It should be noted these do not have bluetooth, which keeps these lower in cost. Instead, you get great sounding speaker for your money and, alternatively, you could easily attach a bluetooth receiver instead, and let’s face it, wireless technology will always get better.
PreSonus Eris E3.5 – Pros
Powered small speaker solution, which will work for most home DJ set ups.
Excellent sound (no glaring highs and nice smooth bass)
Great value at $150 CAD price well worth it.
Proper 1/4″ inputs (which suits most DJ mixer’s booth outputs) but also has 1/8″ and RCA inputs as well.
Speakers this good could ultimately be used somewhere else if you upgrade (e.g. portable studio monitors).
PreSonus Eris E3.5 – Cons
The supplied stereo speaker wire to connect between speakers could be longer (depending on your set up). I had to get a longer one.
EQ controls (pots) on the back feel cheap.
Not an overtly bass-y pair of speakers, if you are going for a more club-heavy feel. Possible these could be paired with a subwoofer. However, it should be noted there are NO Subwoofer out ports.
The walls are closing in, the temperature is rising and a bear is drinking all the beer. This is definitely a case of full blown Saturday night live cabin fever. Here at cottagemixtape.com, we have you covered. In the tradition of the Cottage Country Mix series, Dougie Boom has put together a mix of Rock […]
For the first time EVER, we decided to release our old edit of Chilliwack’s classic tune, “Crazy Talk“. With a little added drums and a whole lot of trippy lake echo, the “Diggy & Dougie Talking Crazy Edit” first appeared on Dougie Boom’s Cottage Country Mix Vol. 5 and is available for the first time […]
More than words: Rosalie and Trevor looking lovely on their wedding I had the pleasure of DJing. photo by BKH Photo.
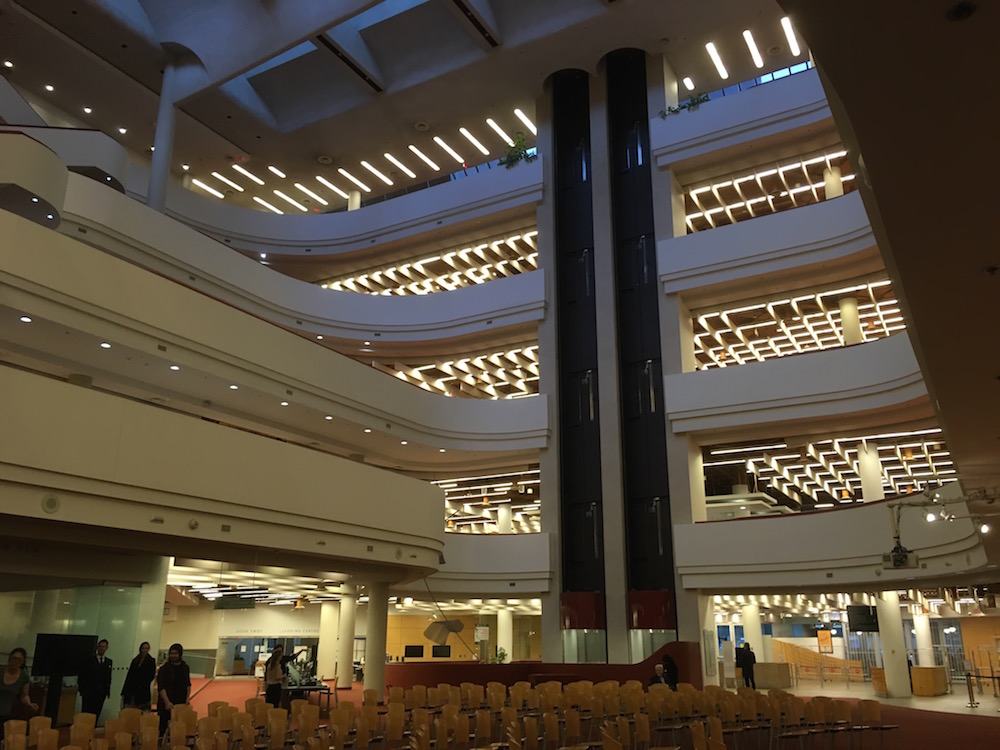
Throwing back to one of my favourite weddings I had the pleasure of playing in last year 2019. My longtime friend Trevor, who was a big early supporter of my DJ career, and his beloved Rosalie asked me to play their wedding and I was so humbled I had to say yes (“I dooooooo!”) The whole event was covered in Toronto Life and (your truly, Dougie Boom) was mentioned in the credits.
Trevor and Rosalie’s wedding was “real” fun. Read about it at TorontoLife.com.
Looking up to see the bride you got an appreciation of the size of the space.
It was a glamorous affair, Rosalie looked lovely in her dress and Trevor (not being totally outdone) looked sharp as well. What was great and unusual was the space, the wedding took place at the Bloor and Yonge Toronto Reference Library. It was my first time playing there and I was very impressed. The ceremony took place on the ground floor foyer and the bride made her dramatic entrance by taking the glass elevator down to her eagerly awaiting husband to be. The entrance music, a string version of Toto’s “Africa” by Vyne String Quartet, and the elevator were perfectly timed, giving the couple ample time to collect their thoughts before the proceedings got underway.
Trevor & Rosalie making memories with friends on the dance floor. Photo by BKH Photo from TorontoLife.com .
The guest and family were all in good spirits throughout the dinner with speeches that segued into a great evening of dancing. The floor never ceased with one couple telling me that if they hadn’t already been married, they would want me to play their wedding. Well there is always the anniversary party. I will play yours too, Trevor and Rosalie 😉
Playing an all 45/ 7″ set at 1101 Cafebar Feb. 7 (osten1101.com)
Very excited to announce I will be playing in Hamilton at 1101 CafeBar on Friday Feb 7th. Playing an all 45 set but not before eating and drinking next door at Osten Beerhall. 1101 and Osten is the new spot brought to you by homies Mark (ex-Royale’s Luncheonette) and Robert (Block Univers, Sixtoo, Megasoid) .
Expect to hear a little of everything: disco, house, hip hop, funk, electro, industrial all on 45. Small records big sound!
So if you were thinking of making the pilgrimage or are living Hamilton come through!
Dougie Boom @ 1101 Cafebar Friday, February 7th, 2020 1101 Cannon St E, Hamilton. Ontario