
Replacing the Sony PS-HX500 stock cartridge with the Nagaoka MP-110
Difficulty: Medium
Time duration: 30 minutes to an hour
After my favourable reviews of the Sony PS-HX500 more than a year ago, and with idle time during self-isolation, I decided it was time to replace the factory needle on the Sony PS-HX500. My first decision was which cartridge?
More Audio Tech Reviews:
• REVIEW: IS THE SONY PS-HX500 THE USB RIPPING TURNTABLE WE HAVE BEEN WAITING FOR?
• PRESONUS ERIS E3.5 SPEAKERS FOR A HOME DJ SET UP (REVIEW)
Which Cart for the Sony PS-HX500?
There are many things to consider when replacing your needle on the Sony PS-HX500. Firstly, it needs to be a moving magnet cartridge. Also, on the Sony PS-HX500 there is no height calibration for the arm, that means the needle needs to be the same height as the stock needle. If it isn’t you will need to get a shorter or taller mat to compensate. Also, most importantly for the Sony PS-HX500, it does not have a removable headshell, instead the wire leads are straight from the tone arm. Only the cartridge is removable. So, there is even more to consider for your needle purchase. Depending on the height of the needle you may have to get a new mat for the difference in height.
So, scouring the internet high and low I narrowed it down to:
- Ortofon 2M Bronze: pricey but I hear performs well. Maybe the next one. [UPDATE: reader KDV commented below that the Ortofon is too big for the headshell. May want to reconsider]
- Goldring 1006: I heard it also performs well on the Sony PS-HX500, but a little pricey in Canada compared to its cost in Britain and Europe.
- Sumiko Pearl: my first choice initially. I worried about replacement needles for the future, as it was not widely available in Canada.
However, everywhere I turned the Nagaoka MP-110 was continually mentioned. Some enjoy the sound, while others think that for its deep bass and crisp highs, it sacrifices the mids. I considered it and thought if my primary use for the Sony is to mostly rip DJ records for digital copies, then good emphasis on the bass is probably a plus. I am not a fan of too much bass reproduction but sometimes you get better results dialing back the bass later, then adding bass to the recording.
I found the cheapest Nagaoka MP-110 in Canada (at the time) at Hifipro.ca and decided to make the purchase. Best case scenario: I like the results. Worst case scenario: I know it is probably going to be better than the stock cartridge that the Sony comes with.

Replacing The Cartridge On The Sony PS-HX500
Disclaimer: replacing the cartridge on the Sony PS-HX500 is notoriously difficult. Again, it doesn’t have a detachable headshell like many turntables you may or may not be familiar with. I thought I was prepared, having replaced cartridges with headshells in the past with ease. The wires however are very thin and very delicate, so proceed with caution. If you have any hesitation you may want to enquire with a stereo repair place to see how much they would charge to do it. Either way I am not responsible, you have been warned.
Things You Will Need
- replacement cartridge (here a Nagaoka MP-110)
- a clean surface
- angled needle nose pliers (1 mm)
- small phillips screwdriver (1 mm)
- cartridge stylus alignment protractor
- digital turntable stylus force scale gauge
- Place turntable on a clean, flat surface.
- Remove the lid from its hinges if attached.
- Clamp down the turntable arm, so it doesn’t move.

- Keep the cartridge attached, do not remove the screws from the cartridge yet.
- Remove the wires from old cartridge first, grabbing only the metal part with your angled needle nose pliers, apply pressure. Do not grip or touch the black rubber insulation nor the coloured wire itself.
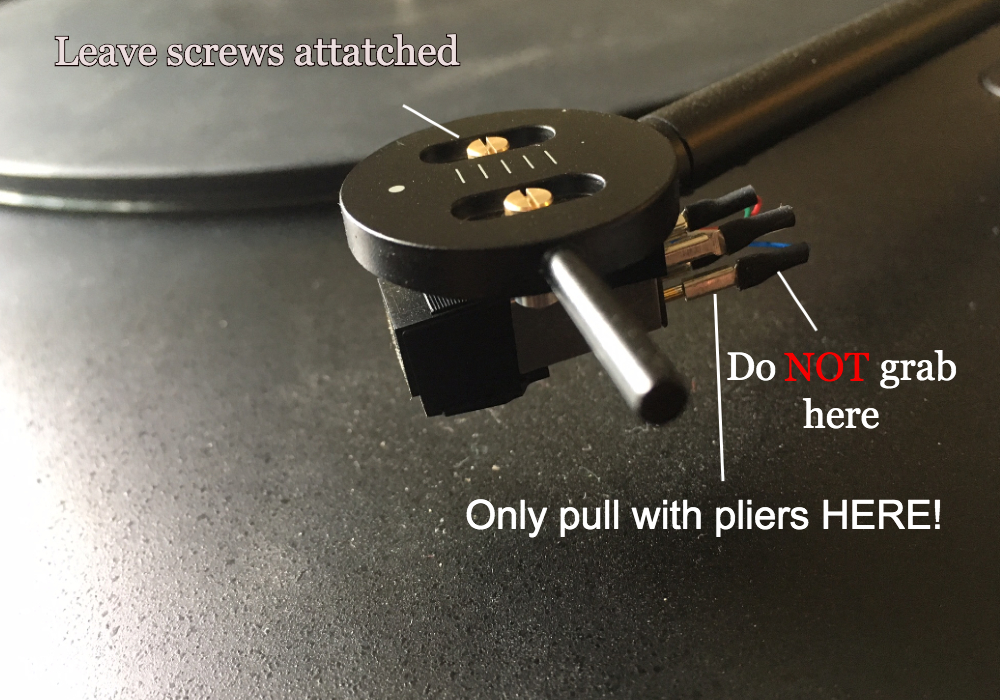
- With light force pull the wire back off of the needle by the metal clasp. You must be careful not to grip too hard or the metal brackets will be squeezed and grip the pins. But also make sure not to lose grip or pull to hard. Doing so may separate the wire from the metal attachment. I almost broke one wire myself.
- Once all the wires are removed then you can detach the old cartridge by unscrewing the tiny screws on top of the headshell.
- Take off the cartridge, save all the screws and washers and replace the plastic cover for the needle (hopefully you kept it, always keep the cover).
- Remove new Nagaoka cartridge from its package.
- To install the The Nagaoka cartridge (in this scenario) it requires you to use the old washers that came with the turntable.
- Simply repeat the steps backwards: attach the needle to the headshell with the screws, then attach the wires to their perspective colours. Taking care to be gentle with the wires.
- Once the cartridge is attached, use your cartridge stylus alignment protractor to make sure needle is properly aligned outside and inside of the center of the platter.
- Finally use your digital turntable stylus force scale gauge to figure how much weight your needle weighs and how much counter weight and tracking you should use.
- Adjust cartridge, weight and tracking where needed.
Results / Reviews
So, far the Nagaoka MP-110 has been a great replacement needle for the Sony PS-HX500. Not only is of the relative same height, so I didn’t need to replace my mat, it also sonically sounds great. Delivering nice bass and good highs and much better staging than the previous needle. It should be noted that once your needle is installed you should give it 50 hours or so of listening to get optimal sound out of your new needle.
Just wanted to add to your hard work so far. I tried to put on the 2M Blue, the cartridge doesn’t fit in the small Sony headshell. You can still mount it but it is not aligned, as in its slightly crooked – just not enough clearance.
Just a note if you decided to drop some serious money on the black version.
Thanks for the heads up! Good to know.
Hey Dougie – about to take possession of a PS-HX500 and seriously contemplating going down the same route as you. Before I do, just want to inquiry as to how the Nagaoka MP-110 is sounding now that your a few months into using it? My musical tastes range from Jazz, Brazilian, Northern Soul, but primarily obscure UK independent releases from the 80’s, hence the desire to digitize stuff that has never seen a MP3/CD release. Cheers
Hey Hobart67,
I have been mostly happy with the results of the Nogoaka. It’s hard to quantify but I would say recordings are 75%-95% there, but its usually based on the limitations of the medium itself. Some records just pop right off surface while others can be low pressings or have condition issues. Regardless, I would highly recommend getting something to clean your records (if you don’t already have something) and a software program to tweak the results. I bought Izotope Elements and upgraded RX 8 Elements to RX 8 standard (for the Spectral De-Noise feature). If you are in the UK maybe one of the more higher end Goldrings (if the cart fits). The Nogoaka is good value though. Maybe listen to the original cart it comes with, then go through the process of recording it from start to finish and then decide what is missing. I may do an article on the recording process and what I have learnt the hard way. Hope it works out.
Thanks Dougie – I’m actually down in Tasmania so getting hold of stuff can take a while. I have however already purchased a Ultrasonic cleaner and have to now used Audacity to record and clean up past attempts, but my old Lenco GL78 (1973 model), whilst a fantastic sounding turntable, comes with a notable hum when recording – hence the purchase of a dedicated ‘recording’ turntable. Thanks for the update and information – especially on how to do the tricky swap should I decide to do so. Cheers!
Hi Dougie, I’m looking to replace the cartridge on my Sony TT as well. Do I need an alignment protractor specifically for the TT or will a generic one be OK?
Hey Lloyd,
To be honest, I just used a generic one and adjusted as needed. If you find one specific to it, feel free to send it my way. Also, feel free to share your results.
Hi Dougie – thanks very much for posting this guide. I wanted to upgrade the cartridge on my PS-HX500 too, and your tutorial was invaluable. I went with a Goldring 1006 and am really loving the results. I’ve written up my experience here, in case it’s of interest: http://www.meiotic.co.uk/my/upgrading-cartridge-sony-ps-hx500/
That’s good news! I am glad the guide was helpful. Your tutorial is also helpful (including using tape to hold the headshell, why not?) I almost went with a Goldring but they can be kind of pricey in Canada. Maybe the next one… and I will use your guide. ha.
I don’t understand how you got this cartridge on to this tone arm. The pins seem to be smaller than the stock cart’s and so the clips are too big to snap onto the nagaoka.
Hey John, (as per steps #8 & 10) you need to use the screws and bolts that came with the turntable from the old needle. The ones included with the Nagaoka are too big.
Hey thanks for the response. Sorry, but, I’m not talking about the screws I’m talking about the 4 colored pins/wires that you use the needle nose pliers on. The pins on the nagaoka are too short for the wires to plug onto once I had it mounted on. They look significantly shorter than the ones on the stock cartridge.
Hey John, sorry I misunderstood. Yes the pins are slightly shorter on the Nagaoka, then the clips on the Sony. I just attached them the best I could by squeezing (gently) the clips around the pins. There is a little 1mm gap, so its not flush but it seems to be unaffected. Hope that answers your question.
Okay, excellent. I wasn’t sure if I should attempt to do something like that or not. Thanks!
Perso sur cette platine je suis passé à la cellule ( violet )MP 200 de NAGAOKA
après un bon rodage de celle ci , c’est juste magique la différence avec celle d’origine
j’ai juste un peut galéré pour ajuster le diamètre des cosses pour la nouvelle cellule , celles ci sont d’un diamètre inférieur.
Cette platine disque à bien d’autres atouts cachés.
j’ai créer une entrée auxiliaire juste après l’ampli OP de la cellule, ce qui me permet d’enregistrer en DSD les écoutes sur COBUZ , cela m’évite d’acheter les albums sur cobuz.
Entrée à faire sur la PIN 6 de IC 602 pour la voix de gauche et PIN 6 de IC 603 pour la voix de droite
Et voila ma platine sony c’est transformé en enregistreur DSD de n’importe quelle source analogique
I replaced mine with Sumiko Pearl (which has a higher height of 20.26 mm and replaced the 5 mm mat with 3 mm cork mat. I can’t find the height of the Sony cartridge but am concerned it may be smaller than 18.26 mm and I my VTA is off?
Any insights or suggestions?
Hey 23jima,
Suggestions? Yea its pretty limited on height adjustment. All you can do is toy with the height of your mat. I know there are places online where you can order a specific height for your mat. I was considering a cork one myself. The rubber one is a dust magnet. Hope it works out.
The Sony cartridge is a rebadged Audio Technica AT3600L. It’s very common, you can look it up for a specification and height measurement so you can compare that to your new cartridge. If both heights are similar you can continue to use your existing mat.